 Save to Pinterest
 My sister called me in a panic two days before Easter, asking if I could make something magical for her daughter's celebration. I found myself standing in my kitchen at midnight, sketching a bunny cake on a notepad, completely charmed by the idea of turning simple cake layers into a fluffy, whimsical creature. The memory that stuck with me wasn't the baking itself—it was my niece's face when she walked into the room and gasped, suddenly convinced a real bunny had hopped onto the dessert table. That's when I knew this cake was worth mastering.
I've made this cake three times now, and each time feels different depending on who's gathering around the table. Last spring, I frosted it in my mother-in-law's kitchen while she narrated stories about Easter dinners from decades ago, and somehow that bunny cake became the bridge between her memories and new ones we were creating. There's something about shaping cake into a creature that invites people to slow down and smile before they even taste it.
Ingredients
- All-purpose flour (2 1/2 cups): The foundation of a tender crumb—don't sift before measuring or you'll end up with a dense cake that won't hold the frosting weight properly.
- Baking powder and baking soda (2 1/2 tsp and 1/2 tsp): This combination creates lift and ensures your bunny ears actually stand upright instead of drooping like a sad hound dog.
- Unsalted butter (1 cup for cake, 1 cup for frosting): Room temperature is non-negotiable here—cold butter won't cream properly and you'll struggle to incorporate air into the batter.
- Granulated sugar (1 3/4 cups): The creaming process with butter is where the magic happens, so don't rush past this step even though your arm gets tired.
- Eggs (4 large, room temperature): Cold eggs won't blend smoothly and can cause the batter to break—set them out while you prep everything else.
- Vanilla extract (1 tbsp for cake, 2 tsp for frosting): Use real vanilla if you can afford it; the flavor difference in a simple cake like this is noticeable and worth it.
- Whole milk (1 cup): Alternating wet and dry ingredients prevents overmixing, which is the enemy of tender cake.
- Powdered sugar (4 cups, sifted): Sifting removes lumps that will show up as grittiness in your frosting—skip this and you'll regret it when spreading.
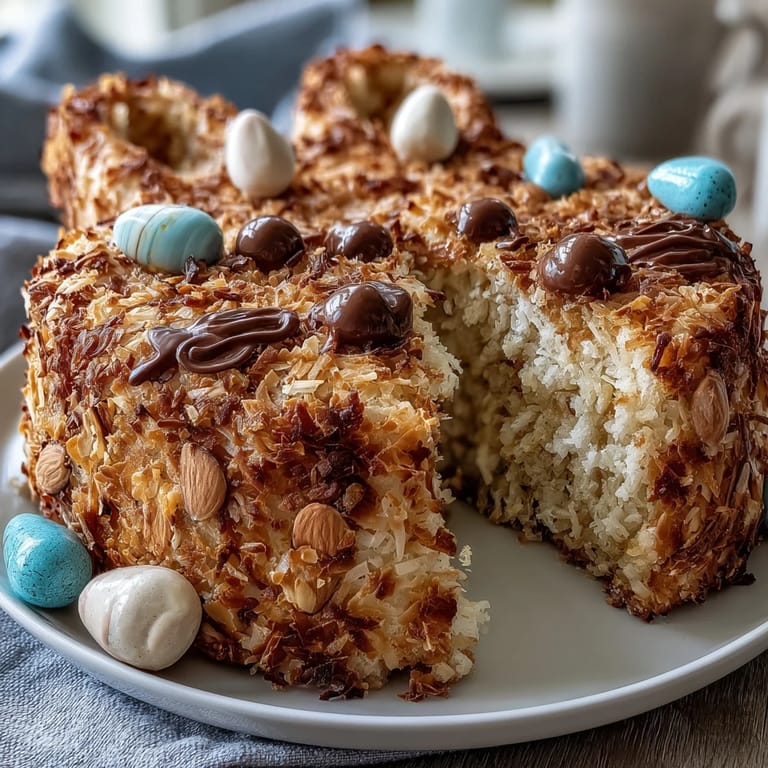
- Sweetened shredded coconut (2 cups): This becomes your bunny's fur, so press it on while the frosting is still slightly tacky or it'll slide right off.
- Jelly beans (1 pink, 4 white, 4 small pink, 2 black or chocolate chips): These transform a cake into a character, so place them thoughtfully like you're directing a tiny edible play.
Tired of Takeout? 🥡
Get 10 meals you can make faster than delivery arrives. Seriously.
One email. No spam. Unsubscribe anytime.
Instructions
- Preheat and prep your pans:
- Set your oven to 350°F and take a moment to properly grease and flour your cake pans—this step prevents the heartbreak of a cake that sticks. I learned this the hard way by rushing, and watching my cake tear in half during unmolding is an image I'd rather forget.
- Mix your dry ingredients:
- Whisk flour, baking powder, baking soda, and salt together in a bowl—this distributes the leavening agents evenly so you get consistent rise. The whisking motion also incorporates a tiny bit of air before the wet ingredients arrive.
- Cream butter and sugar:
- Beat them together for a full two to three minutes until the mixture turns pale and fluffy, which usually looks lighter in color and feels airy when you run a spatula through it. This step builds the structure that will hold your jelly bean decorations without crumbling.
- Add eggs one at a time:
- Beat each egg in completely before adding the next one, which takes about a minute per egg but ensures they emulsify properly into the butter mixture. Patience here prevents a separated, greasy batter that bakes up dense.
- Alternate wet and dry ingredients:
- Start with the flour mixture, then milk, then flour, ending with flour—this technique keeps overmixing at bay while ensuring even distribution of ingredients. Listen to your mixer change sound as the batter comes together; when it sounds smooth rather than scratchy, you're done.
- Divide and bake:
- Pour batter equally into both pans and bake for thirty to thirty-five minutes until a toothpick comes out clean and the tops spring back when you poke them gently. The kitchen will smell like vanilla heaven, and that's your signal you're on the right track.
- Cool with patience:
- Let cakes sit in pans for ten minutes, then turn them out onto a wire rack to cool completely—rushing this step means warm cake will crumble when you cut and shape it. A completely cool cake is forgiving; a warm one is your enemy.
- Beat frosting to silky smoothness:
- Cream the butter first, then gradually add powdered sugar so it doesn't puff into a sugar cloud all over your kitchen. Add milk a tablespoon at a time until you reach a consistency that spreads easily but holds its shape.
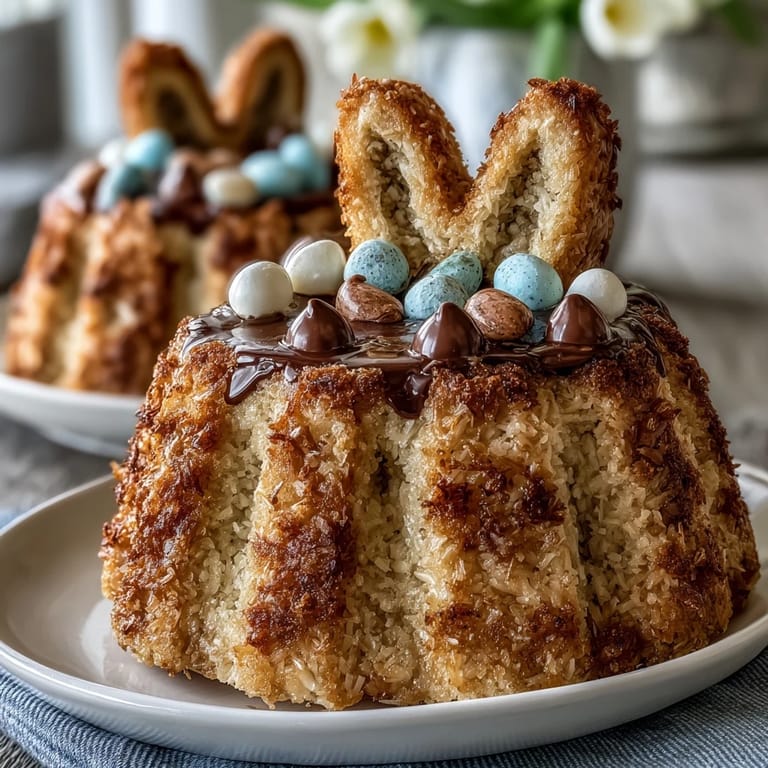
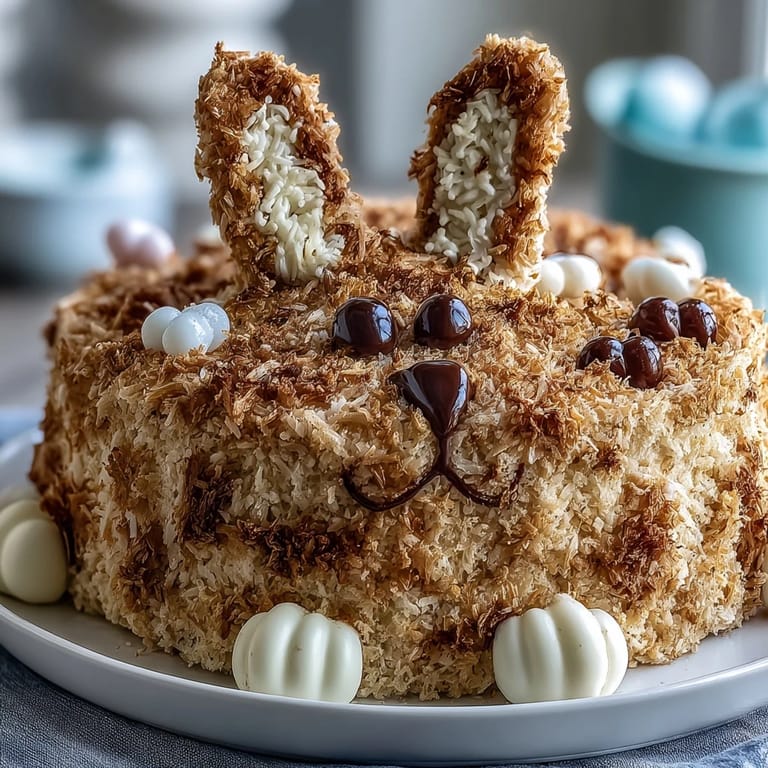
- Create your bunny body:
- Place one whole cake round on your serving platter as the body, then stand two semicircles (cut from the second cake) upright at one end to form the ears and back of the head. This is the moment when abstract cake suddenly becomes something recognizable and magical.
- Carve ears and paws:
- Use a serrated knife to carefully cut ear and paw shapes from the remaining cake, using the frosting between pieces as edible glue to hold everything in place. Don't worry about perfection; bunny anatomy is forgiving and charmingly wonky is part of the appeal.
- Frost generously:
- Cover the entire cake with a thick layer of frosting, filling gaps and smoothing surfaces where you can—this frosting is your canvas. Some people say thin frosting is elegant; I say thick frosting is forgiving and delicious.
- Add the coconut fur:
- Press shredded coconut all over the frosted cake, working section by section while the frosting is still slightly sticky—you're essentially giving your bunny a full-body coat. The coconut adheres best to frosting that's cool but not set, so timing is everything.
- Arrange the jelly bean features:
- Place the large pink jelly bean as a tail, white and pink jelly beans on the paws, and chocolate chips or black jelly beans for eyes—step back occasionally to see how your bunny is coming to life. This is where playfulness matters more than precision; a slightly off-center eye gives your bunny personality.
- Optional pink coconut ears:
- If you want to, tint some coconut pink with food coloring and press it onto the ear flaps for a finished touch that adds delicate detail. This step is optional but transforms your bunny from cute to absolutely precious.
- Chill until serving:
- Refrigerate the finished cake until you're ready to unveil it, which keeps the frosting firm and the coconut intact. The chill also mellows all the flavors into something harmonious and delicious.
 Save to Pinterest
 My favorite moment happened when my niece insisted on helping me add the jelly beans, and she placed both eyes exactly where they belonged with the seriousness of a sculptor. We stood there together looking at our creation, and she whispered, 'He's smiling,' and suddenly the cake wasn't just food anymore—it was a friend, a character, a little edible being that brought joy to everyone in the room. That's when I understood why people make cakes like this.
Cake Flavor Variations to Try
The vanilla base is intentionally mild so it appeals to everyone, but I've gotten creative with subtle flavor additions that enhance without overwhelming. A tablespoon of almond extract in place of some vanilla adds sophistication, while lemon zest stirred into the batter brings brightness that pairs beautifully with the sweetness of the frosting and jelly beans. I've also experimented with a splash of orange extract, which feels festive and spring-like without making the cake taste like a candy.
Structural Tips for Bunny Stability
The first time I assembled this cake, I didn't think about physics, and the ears drooped sideways by dinnertime like my bunny was having an existential crisis. I learned that supporting the ear semicircles with a dowel rod hidden inside or by making them slightly thicker at the base makes a tremendous difference in how they hold their pose throughout the day. You can also insert toothpicks where pieces meet for extra stability, though hide them under frosting or coconut so your presentation stays pristine.
Decorating Shortcuts and Storage
Not everyone has the time or confidence to shape cake from scratch, and I'm here to tell you that store-bought cake layers work beautifully—you save thirty minutes and focus your energy on the creative assembly and decoration instead. If you go this route, a simple homemade frosting is still worth making because it tastes infinitely better than pre-made options and transforms the whole experience. The finished cake keeps refrigerated for three days, though you'll want to cover it loosely with plastic wrap so the coconut doesn't dry out and the jelly beans don't get sticky.
- A bench scraper or offset spatula makes frosting application smoother and more professional looking than a butter knife.
- Tint coconut pink the day before and let it dry on a paper towel so you're not rushing this step during assembly.
- Keep extra jelly beans on hand because your taste testers (read: you) will be tempted to sample them before they reach the cake.
 Save to Pinterest
 Making an Easter Bunny cake is less about following rules perfectly and more about creating a moment that people will remember. The smile on a child's face, the laughter around the table, the way people slow down to admire something made with care—that's what this recipe is really about.
Recipe FAQs
- → How do I shape the bunny figure using cake layers?
Use two round cake layers; place one whole layer as the body, cut the other into semicircles for the head and back, and smaller shapes for ears and paws, attaching all with frosting.
- → What gives the bunny its fluffy appearance?
Lightly pressed sweetened shredded coconut onto the frosted cake replicates soft, fluffy fur for a whimsical look.
- → How are the decorations like the tail and eyes created?
Colorful jelly beans form the bunny’s tail and paw pads, while mini chocolate chips or black jelly beans serve as the eyes for detailed accents.
- → Can I prepare this cake ahead of time?
Yes, you can bake, frost, and decorate the cake in advance, then chill it until serving to maintain freshness and shape.
- → Are there any tips for enhancing the cake’s flavor?
Consider adding lemon or almond extract to the batter for an extra layer of flavor that complements the festive design.