 Save to Pinterest
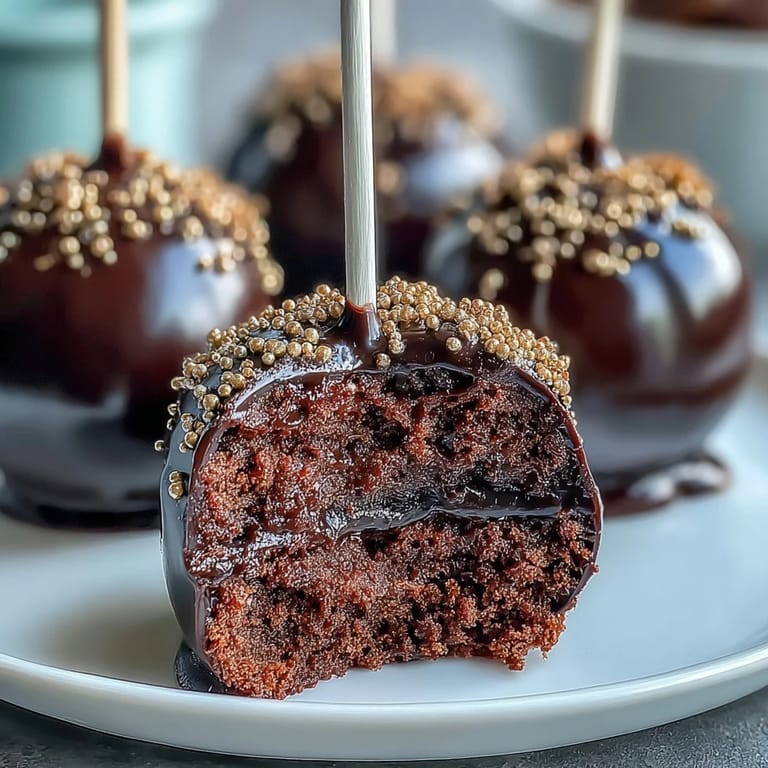
 My kitchen flooded with green decorations the week before St. Patrick's Day when my niece announced she'd volunteered me to bring something festive to her school party. I stood there surrounded by shamrock garlands, suddenly inspired to create something that felt like edible magic—little pots overflowing with gold. These Pot of Gold cake pops became my answer, and watching her face light up when she saw them made every dipped, sprinkled moment worthwhile.
I remember my friend Sarah sitting at my kitchen counter with a cup of tea, skeptical that cake pops could actually look elegant. Then I handed her the finished product and she literally gasped—she ordered them for her book club's St. Patrick's Day potluck without even tasting one first. That's when I realized these weren't just desserts; they were conversation starters with chocolate hearts.
Ingredients
- Chocolate cake mix (1 box): Use a quality brand you actually like eating plain, because that flavor becomes the foundation of everything—I learned this the hard way with a box I'd grabbed in a rush.
- Chocolate frosting (120 g or ½ cup): Store-bought is your friend here; it's the glue that holds those crumbs together into rollable balls.
- Black candy melts (400 g or 14 oz): These create that pot-like coating and they melt more smoothly than chocolate chips, so don't skip this swap if you're tempted.
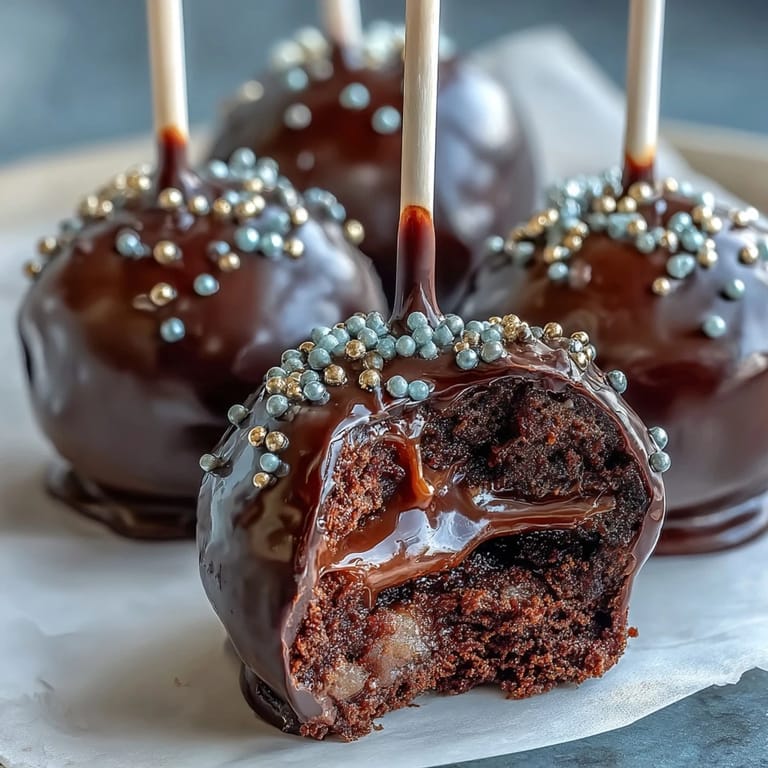
- Gold sprinkles or edible gold pearls (48 g or 2 oz): The moment these hit the black coating while it's still wet, your pops transform into something that looks store-bought fancy.
- Lollipop sticks (24): Look for food-safe wooden ones; they're sturdy enough to hold a coating without snapping.
- White candy melts (50 g or 1.75 oz, optional): These add delicate rims that make each pot look like it has a fancy gold band—totally optional but absolutely worth it if you have them.
- Green fondant or sprinkles (optional): A small shamrock detail on top turns these from festive to thematic in one quick move.
Tired of Takeout? 🥡
Get 10 meals you can make faster than delivery arrives. Seriously.
One email. No spam. Unsubscribe anytime.
Instructions
- Bake your chocolate foundation:
- Follow the cake mix package directions exactly, then let that cake cool completely on a wire rack—rushing this step means you'll end up with melted frosting and a frustrated you.
- Transform cake into crumbs:
- Crumble the cooled cake into a large bowl using your hands or a fork, breaking it down until it resembles breadcrumbs; this is meditative work and oddly satisfying.
- Create your dough:
- Fold the chocolate frosting into the crumbs gradually, mixing until you have a dough that holds together when squeezed but isn't mushy. It should feel like Play-Doh that you actually want to eat.
- Roll and shape:
- Scoop the mixture into roughly 1.5-inch balls and flatten the tops slightly to mimic little pot shapes; I use a small cookie scoop and my thumb to create that signature silhouette.
- Chill for structure:
- Refrigerate the shaped balls for 30 minutes on a parchment-lined tray so they firm up and won't fall apart when you dip them.
- Prepare your sticks:
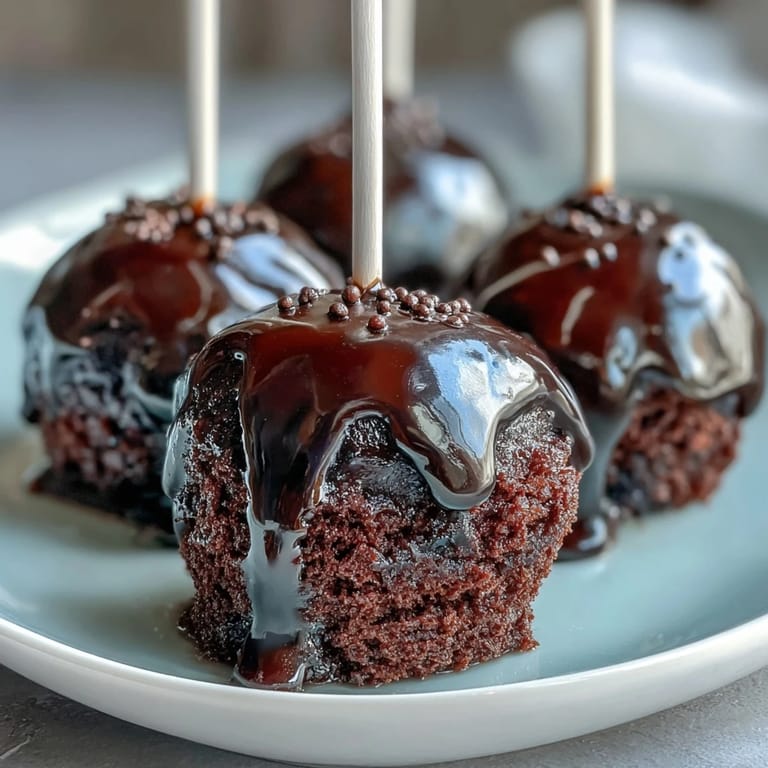
- Melt the black candy melts following package instructions, then dip each stick's tip into the melted coating and insert it halfway into a cake ball. Let them chill for 10 minutes so the sticks truly set.
- The satisfying dip:
- Working quickly, fully submerge each cake pop into the black candy melts, let the excess drip off, then stand it upright in a styrofoam block or cake pop stand. The whole move should feel smooth and confident.
- Gold rush moment:
- Before the black coating hardens, immediately sprinkle or press gold sprinkles onto the top of each pop—this is your window of opportunity, so work fast and don't second-guess.
- Add elegant details:
- If using white candy melts, pipe a thin ring around the top of each pot for a fancy finishing touch that makes them look like jewelry boxes.
- Shamrock accent (optional):
- Add a tiny green fondant shamrock or a sprinkle of green decoration to lean into the St. Patrick's Day theme.
- Final set:
- Let everything harden completely at room temperature before serving or packaging; patience here ensures your decorations actually stay put.
 Save to Pinterest
 There's something genuinely magical about watching a plain cake ball transform into a shimmering pot of gold under your hands. My son, who usually thinks homemade desserts are 'trying too hard,' actually asked if he could bring extras to school to show his friends—that's when I knew these weren't just fancy cake pops, they were tiny edible stories about celebration.
Timing Your Decoration Strategy
I learned the hard way that timing is everything with these pops. If you wait too long after dipping, the coating sets and your gold sprinkles won't stick; too fast and you're juggling warm pops everywhere. The sweet spot is that golden 30-second window right after you lift a pop from the melted coating—work in batches of three or four so you're not overwhelmed, and keep your sprinkles in a shallow bowl for easy grabbing.
Storage and Make-Ahead Magic
These pops actually get better over a day or two as the flavors settle, unlike many desserts that peak fresh from the kitchen. I've made batches three days ahead for parties and stored them in airtight containers at room temperature; they stayed perfect and actually looked fresher than I expected. The coating protects the cake inside from drying out, so you're winning on both taste and texture.
The Details That Elevate Everything
The real secret to making these feel like fancy bakery pops is committing to the details—that white rim, the shamrock accent, the way you arrange them in a display. I started out thinking these were unnecessary, but a friend pointed out that those tiny touches are what make people think you spent hours on these when really you spent maybe 45 minutes of actual hands-on work. Now I lean into the embellishments because they're quick and they genuinely transform the whole presentation.
- Use a toothpick to position any fondant shamrocks while they're still soft so they stick exactly where you want.
- Dust off any loose sprinkles before serving so they don't scatter all over the plate and make a mess.
- Display them in a cake pop stand or styrofoam block covered with green tissue paper for maximum festive impact.
 Save to Pinterest
 There's something quietly wonderful about making desserts that look impossible but taste like pure joy and chocolate. These Pot of Gold cake pops have become my go-to celebration treat, and I hope they become yours too.
Recipe FAQs
- → What type of cake mix works best for these pops?
A chocolate cake mix creates the rich, moist base needed for the pops, providing both flavor and structure.
- → How can I prevent the candy coating from cracking?
Ensure the cake balls are well chilled before dipping and cool the candy melts carefully to avoid overheating, which helps maintain a smooth coating.
- → Can I use different decorations besides gold sprinkles?
Yes, green fondant or shamrock-shaped sprinkles can add a festive touch, enhancing the visual appeal.
- → What is the best way to store these cake pops?
Store in an airtight container at room temperature for up to three days to maintain freshness.
- → Are there gluten-free options for this treat?
Using a gluten-free cake mix and verifying decorations are gluten-free can make this suitable for gluten-sensitive individuals.